
In the last post we saw how to create a simple Login UI in XAML now let’s try to wire it up with code behind for this we will be using the Name property defined by Microsoft in their name space as we saw here lets see how it looks:
<?xml version="1.0" encoding="utf-8" ?>

<ContentPage xmlns="http://xamarin.com/schemas/2014/forms"

xmlns:x="http://schemas.microsoft.com/winfx/2009/xaml"

x:Class="Blogsapp.samplepage2"

BackgroundColor="Gray">

 <ContentPage.Content>

 <StackLayout Spacing="20" Padding="20"

VerticalOptions="Center">

 <Entry Placeholder="Username"

x:Name="Uname"/>

 <Entry Placeholder="Password"

x:Name="Pass"

IsPassword="true"/>

 <Button Text="Login" TextColor="White"

x:Name="Login"

BackgroundColor="Blue"/>

 </StackLayout>

 </ContentPage.Content>

</ContentPage>
So when we give the Name property with(x:Name) the compiler creates a private field internally so we will be able to access it from code behind let’s see how
public partial class samplepage2 : ContentPage

{

public samplepage2()

{

InitializeComponent();

Login.Clicked += Login_Clicked;

}

private async void Login_Clicked(object sender, EventArgs e)

{

var Username = Uname.Text;

var Password = Pass.Text;

if (Username == Password && Username.Length > 0 && Password.Length > 0)

{

await DisplayAlert("Hai", "thats r8", "ok");

}

}

}
here as you can see we are able to access the XAML components from code behind
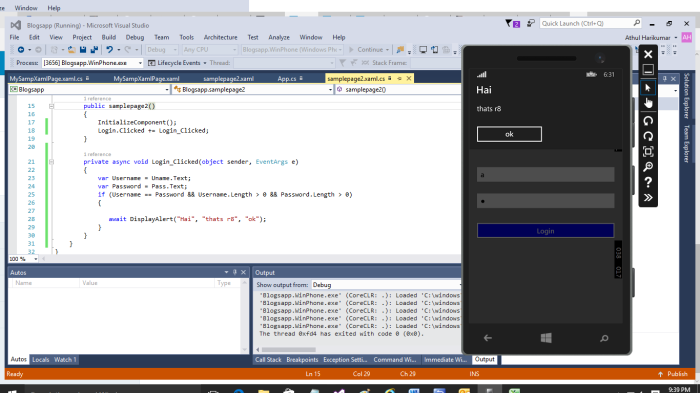
let’s have a look at the result
DisplayAlert is a Xamarin.Forms implementation which will show an alert with up to two button’s in UI (UIAlert in iOS and AlertDialog in Android) it is awaitable (see about async and await in next post)
But the whole advantage of XAML is binding we haven’t used binding yet let’s see how to use MVVM and data binding in next post.

One thought on “Wiring up XAML to Code Behind”